Fixtures disposal guide for UK contractors
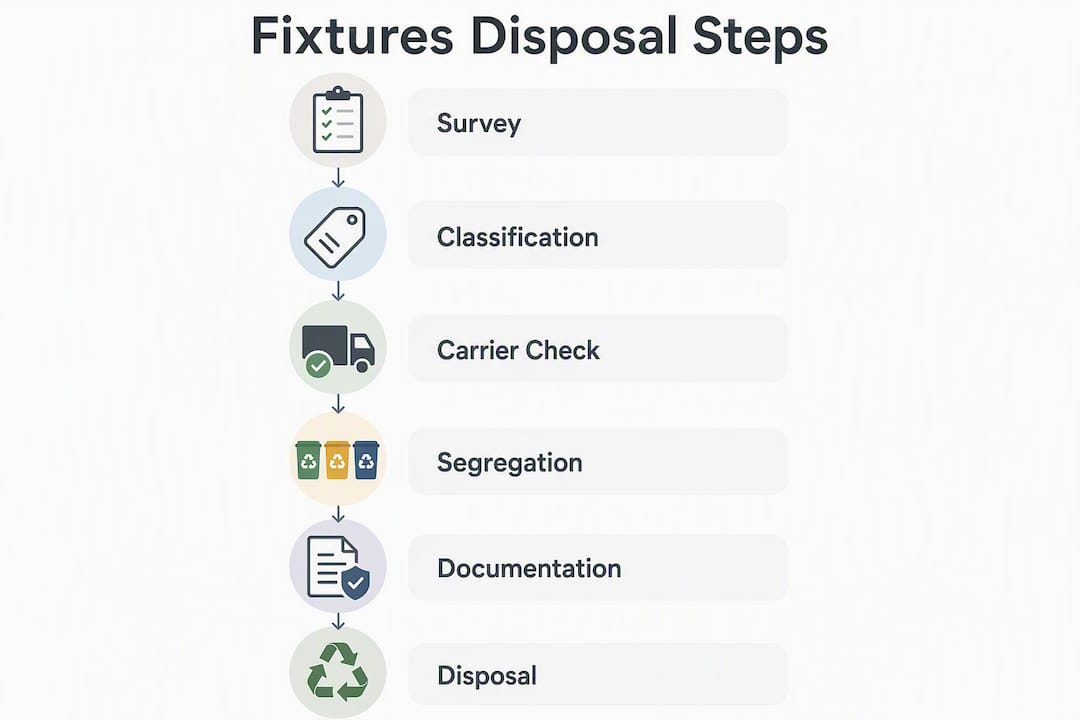
Before the first load of stripped fixtures leaves your site, you must classify every waste stream using the WM3 technical guidance and complete the correct transfer paperwork. Non-hazardous waste requires a Waste Transfer Note (WTN); hazardous waste requires a Consignment Note. Both obligations flow from the Environmental Protection Act 1990, which places a duty of care on every business producing or handling controlled waste. The Waste (England and Wales) Regulations 2011 and CDM Regulations 2015 add further requirements around the waste hierarchy declaration and written planning. Here is what to do before work starts:
- Assign an EWC code to each fixture waste stream following the WM3 procedure.
- Determine whether each stream is non-hazardous (WTN) or hazardous (Consignment Note).
- Sign the waste-hierarchy producer declaration on every transfer document.
- Verify your carrier holds a current Environment Agency registration.
- Retain all records for a minimum of two years.
Gcscontractors integrates these steps into every strip-out programme it delivers across Cambridge and East Anglia, reducing compliance risk from day one.
Table of Contents
- What your site team must confirm before strip-out begins
- How to classify fixtures correctly and avoid mirror-entry mistakes
- How to apply the waste hierarchy on site and prepare fixtures for reuse
- What to include on Waste Transfer Notes and Consignment Notes
- How to choose and verify a waste carrier before any load moves
- Step-by-step protocol for hazardous fixtures
- What drives time and cost in fixtures disposal
- How CDM Regulations 2015 require you to plan and record waste management
- How Gcscontractors manages fixtures disposal on strip-out projects
- Key takeaways
- What the audit failures we see most often actually look like
- Gcscontractors: compliant strip-out and fixtures disposal in Cambridge and East Anglia
- Useful sources for UK fixtures disposal compliance
What your site team must confirm before strip-out begins
Use this checklist on day one. Every item should be confirmed in writing before any fixture is removed.
- Waste classification decision recorded for each material stream, with supporting evidence.
- Correct paperwork assigned: WTN for non-hazardous loads, Consignment Note for hazardous.
- Carrier registration number checked against the Environment Agency public register.
- On-site storage and segregation plan agreed, with labelled bays for each waste type.
- CDM plan updated to include waste management responsibilities and nominated contacts.
Keep copies of the carrier registration certificate, the receiving facility’s permit or exemption, and at least one completed WTN on site at all times. Inspectors can arrive unannounced, and missing documents can halt the programme immediately.
Pro Tip: Producer liability does not end when the skip leaves the gate. Under the Duty of Care, you remain responsible for the waste until it reaches a lawfully permitted facility. Retain destination permit evidence alongside your WTNs.
How to classify fixtures correctly and avoid mirror-entry mistakes
Correct EWC code assignment is the foundation of a compliant fixtures disposal guide. Visual inspection alone is never sufficient; the WM3 guidance sets out a seven-step process that includes chemical composition analysis and hazardous property testing.
Step-by-step WM3 procedure:
- Identify candidate EWC codes from Chapter 17 (construction and demolition waste).
- Check whether any candidate code is a ‘mirror’ entry, meaning it can be either hazardous or non-hazardous depending on assessment.
- Commission sampling and laboratory analysis where mirror entries apply or contamination is suspected.
- Assign the code and record the evidence; attach lab reports to the WTN or Consignment Note.
Mirror entries are a common source of error on strip-out projects. EWC code 17 05 03* denotes hazardous excavated soil; 17 05 04 is its non-hazardous counterpart. The distinction requires a formal assessment, not a site manager’s judgement call. Concrete (typically 17 01 01), timber (17 02 01), and mixed metals (17 04 07) are usually non-hazardous, but contamination from coatings, treatments, or adjacent materials can change that classification entirely. Landfill WAC tests are not an acceptable substitute for WM3 classification; the Environment Agency is explicit that classification requires separate chemical assessment.
Pro Tip: When a material’s status is uncertain, treat it as potentially hazardous until laboratory results confirm otherwise. Reclassifying downward is straightforward; moving hazardous waste on a WTN is a criminal offence.
How to apply the waste hierarchy on site and prepare fixtures for reuse
The Waste (England and Wales) Regulations 2011 require producers to apply the waste hierarchy before transfer and to confirm this with a signed declaration on every WTN. The hierarchy runs: prevention, preparing for re-use, recycling, recovery, and disposal as the last resort.
Practical on-site measures to apply the hierarchy:
- Establish segregation zones before strip-out begins, with each bay labelled by EWC code.
- Identify salvageable fixtures (sanitaryware, metal pipework, door furniture, structural steel) for reuse routes before they are mixed with general waste.
- Route recoverable metals to a licensed metal reclamation facility; use salvage yards or specialist recyclers for sanitaryware and timber joinery in good condition.
- Cover stored materials to prevent contamination and preserve reuse value.
- Tag inventoried items with a reference number linking them to the site logbook.
When disconnecting plumbing fixtures for potential reuse, drain disconnection best practice recommends capping all open pipework immediately to prevent contamination of the fixture and the surrounding waste stream. Items that cannot be reused or recycled must be treated as waste from the point they are set aside.
Pro Tip: Segregating metals early typically reduces overall disposal costs because clean metal attracts reclamation value rather than a disposal charge. Quantify this at the pre-start survey stage and include it in the project budget.
What to include on Waste Transfer Notes and Consignment Notes
Waste Transfer Notes must be completed for every non-hazardous load. Consignment Notes are mandatory for every hazardous movement and are tracking documents, not simple receipts.
| Field | Waste Transfer Note (non-hazardous) | Consignment Note (hazardous) |
|---|---|---|
| Waste description | Required — plain language plus EWC code | Required — detailed description and EWC code |
| Quantity | Weight or volume per load | Weight per consignment |
| Producer declaration | Signed confirmation waste hierarchy applied | Signed by consignor |
| Carrier details | Registration number and company name | Registration number, vehicle details |
| Receiving facility | Address and permit/exemption reference | Address, permit number, consignee signature |
| Date of transfer | Required | Required — time of collection also |
Retain all WTNs and Consignment Notes for a minimum of two years. Season tickets (annual WTNs) are permitted for repeat identical movements, but inspectors expect a contemporaneous schedule recording dates, times, and quantities for each individual transfer. A season ticket without a supporting schedule is treated as incomplete documentation at audit.
- Link every WTN or Consignment Note reference to the corresponding lab report and CDM record.
- Store documents in a dedicated project file, accessible on site and at the office.
- Cross-reference each document against the carrier’s registration number before signing.
How to choose and verify a waste carrier before any load moves
Choosing an authorised, registered carrier is one of the most effective steps a producer can take to reduce enforcement risk. Check the Environment Agency public register before each project, not just once at procurement, to verify carrier registration status.
Before any load moves, confirm:
- The carrier holds a current upper-tier waste carrier registration (required for construction waste).
- The receiving facility holds a permit or compliant exemption that covers the declared waste types.
- The carrier’s insurance and indemnity arrangements are adequate for the loads being moved.
Ask the carrier directly for their acceptance criteria, the treatment route for each waste type, and how they will evidence final disposal or recovery. For hazardous loads, confirm the consignment procedure and how they will return the completed Consignment Note to you.
Pro Tip: Save a PDF copy of the carrier’s registration certificate and the receiving facility’s permit page into the project file on the day you appoint them. Carrier registrations can lapse mid-project; a mid-programme check takes two minutes and can prevent a significant compliance failure.
Logistics decisions also affect documentation. Each skip or roll-on/roll-off movement must be linked to its own WTN or Consignment Note reference. Tracking movements by load, not by day, makes the audit trail clean and straightforward to reconstruct.
Step-by-step protocol for hazardous fixtures
Fixtures containing asbestos, lead, PCBs, or residual oils require a separate protocol. Treat any suspect material as hazardous until a competent person’s assessment proves otherwise, and document who carried out that assessment.
- Identify and isolate. Stop work in the affected area. Cordon off the fixture and mark it clearly as potentially hazardous.
- Commission a competent assessment. A qualified surveyor or analyst must inspect and, where required, sample the material. Visual inspection alone does not satisfy WM3.
- Submit samples for laboratory analysis. For asbestos, WM3 guidance specifies that waste containing free dispersed asbestos fibres at 0.1% or more is classified as hazardous. Separate sub-sampling is standard practice to avoid mixing hazardous and non-hazardous fractions.
- Assign the EWC code and complete a Consignment Note. Attach the lab report to the note.
- Arrange secure storage and transport. Use appropriate PPE, decontamination procedures, and a licensed hazardous waste carrier.
- Retain the completed Consignment Note and chain-of-custody records for a minimum of two years.
Pro Tip: If contamination is discovered mid-strip-out, stop, segregate, and reassess before continuing. Mixing a hazardous fraction into a non-hazardous skip creates a hazardous load for the entire skip and significantly increases disposal cost and liability.
For broader demolition safety precautions covering PPE and site controls, the Gcscontractors site manager’s guide covers the full range of on-site safety obligations.
What drives time and cost in fixtures disposal
Classification and sampling are the longest lead-time items. Laboratory turnaround for standard construction waste samples typically runs several working days; asbestos or specialist chemical analysis can take longer. Build this into your programme before strip-out starts, not after.
Key cost drivers to budget for:
- Laboratory testing and sampling fees, which vary by material type and number of samples.
- Hazardous waste handling premiums charged by carriers and treatment facilities.
- Carrier and treatment tariffs, which differ between non-hazardous and hazardous streams.
- Landfill tax on non-recoverable waste (standard rate applies to most construction waste).
- Administration costs for WTN and Consignment Note management on large projects.
Early segregation for recycling and salvage resale reduces net disposal cost. Metal reclamation, in particular, can offset carrier charges on projects with significant structural steel or copper pipework. Pre-qualifying carriers and treatment facilities before tender stage avoids last-minute premium pricing. For further guidance on recycling demolition outputs, the Gcscontractors 2026 guide covers diversion strategies in detail.
How CDM Regulations 2015 require you to plan and record waste management
CDM Regulations 2015, Regulation 20 require all demolition and dismantling work to be planned and recorded in writing before it begins. Waste management is part of that plan, not an afterthought.
The CDM plan for a fixtures strip-out must include:
- Waste classification decisions and the evidence basis for each.
- On-site handling measures: segregation zones, storage arrangements, and contamination controls.
- Nominated responsible persons for waste management and their interfaces with the principal contractor.
- References to laboratory reports, WTNs, Consignment Notes, and carrier permits.
Integrate the waste management records into the CDM project file so they are retrievable at inspection. The person responsible for waste records should be named in the plan, and those records must be handed over as part of the practical completion package. Linking the building deconstruction process to the CDM plan from the outset is the most reliable way to keep documentation current throughout the programme.
How Gcscontractors manages fixtures disposal on strip-out projects
Gcscontractors follows a structured workflow on every strip-out project, from pre-start survey through to final disposal verification.
| Stage | Activity | Output |
|---|---|---|
| Pre-start survey | Material identification, sampling commission, EWC code assignment | Classification schedule with evidence |
| Paperwork assignment | WTN or Consignment Note prepared per stream | Signed documents linked to CDM plan |
| Segregation and storage | Labelled bays established, salvageable items inventoried | Site logbook entries |
| Carrier selection | Registration and permit checks completed | Carrier file with certificates |
| Movement and verification | Each load linked to WTN/Consignment Note reference | Audit trail per load |
| Record retention | Full project file retained for minimum two years | Handover pack at practical completion |
On a typical commercial strip-out, early classification during the pre-start survey allows carrier procurement and paperwork preparation to run in parallel with mobilisation, removing the classification delay from the critical path entirely. Gcscontractors’s site clearance services and construction waste guidance provide further detail on how material categories are managed from first fix to final clearance.
Key takeaways
Compliant fixtures disposal requires classification, correct paperwork, a verified carrier, on-site segregation, and two-year record retention before any load leaves site.
| Point | Details |
|---|---|
| Classify before movement | Assign EWC codes using WM3 and complete the correct document (WTN or Consignment Note) before the first load moves. |
| Sign the producer declaration | The Waste (England and Wales) Regulations 2011 require a signed waste-hierarchy declaration on every transfer document. |
| Verify your carrier | Check Environment Agency registration and the receiving facility’s permit before appointing any carrier. |
| Retain records for two years | WTNs, Consignment Notes, lab reports, and carrier certificates must all be kept for a minimum of two years. |
| Gcscontractors | Gcscontractors integrates classification, paperwork, carrier verification, and CDM recording into every strip-out project it delivers. |
What the audit failures we see most often actually look like
The most common compliance failures on strip-out projects are not dramatic. They are incomplete WTNs missing the producer declaration, classification decisions recorded as “assumed non-hazardous” with no supporting evidence, and carrier appointments made without checking whether the registration was still current. Each one is straightforward to prevent; each one can result in enforcement action, programme delay, or personal liability for the site manager.
The corrective measures Gcscontractors applies are equally straightforward: a pre-start documentation review, a classification schedule signed off before strip-out begins, and a carrier file checked and filed on appointment day. These are not additional bureaucracy; they are the minimum standard the Duty of Care Code of Practice expects.
Pro Tip: Run a 15-minute pre-start documentation check with the site manager and the waste carrier before the first fixture comes down. Confirm the WTN fields are complete, the carrier registration is current, and the receiving facility’s permit covers the declared waste types. That check costs almost nothing and closes the three most common audit failure points in one conversation.
Gcscontractors: compliant strip-out and fixtures disposal in Cambridge and East Anglia
Fixtures disposal done properly requires more than a skip and a carrier. It requires classification evidence, signed transfer documents, verified permits, and a CDM plan that reflects how waste is actually managed on site.

Gcscontractors delivers strip-out and demolition services across Cambridge and East Anglia with waste documentation, carrier verification, and CDM integration built into every project from day one. The team handles hazardous and non-hazardous streams, manages the full paperwork chain from pre-start survey to practical completion handover, and keeps your project on programme by resolving classification questions before they reach the critical path. For a clear picture of how disposal fits into the full project sequence, the demolition sequence guide sets out the complete workflow. Contact Gcscontractors to arrange a pre-start site survey and get your fixtures disposal plan in place before work begins.
Useful sources for UK fixtures disposal compliance
Keep these documents bookmarked or printed for site inspections and audit preparation.
- Environmental Protection Act 1990, Section 34: the primary statutory basis for the Duty of Care; every contractor handling controlled waste must understand its obligations here.
- Waste duty of care code of practice (DEFRA): practical guidance on producer responsibilities, carrier verification, and record-keeping; the document inspectors reference most often.
- Waste Transfer Note template (GOV.UK): the official WTN form with all required fields; use it as a reference for what your own documentation must capture.
- Waste classification technical guidance WM3 (Environment Agency): the seven-step classification procedure and mirror-entry guidance; essential for any project involving mixed or potentially contaminated materials.
- Construction and demolition waste: how to classify (GOV.UK): practical guidance on Consignment Notes and hazardous waste tracking for construction projects.
- CDM Regulations 2015, Regulation 20 (legislation.gov.uk): the legal requirement to plan and record demolition work in writing, including waste management.
- CECA waste classification and permitting guide: practical flowcharts for material categories, permit checks, and exemption requirements; useful for site managers working through classification decisions on mixed loads.