Suspended floor installation Cambridge: a homeowner’s guide
Suspended floor installation is defined as a flooring method where the floor structure sits above the ground on a series of beams or supports, creating a void beneath. In Cambridge, this approach is standard for both residential extensions and commercial developments, where ground conditions and UK Building Regulations Part L demand careful thermal and structural planning. The two dominant systems are timber suspended floors and precast concrete beam and block. Choosing the wrong one for your site can mean failed inspections, poor energy performance, and costly remedial work. This guide covers both systems, the groundwork required, and the full installation process.
What types of suspended floor systems suit Cambridge projects?
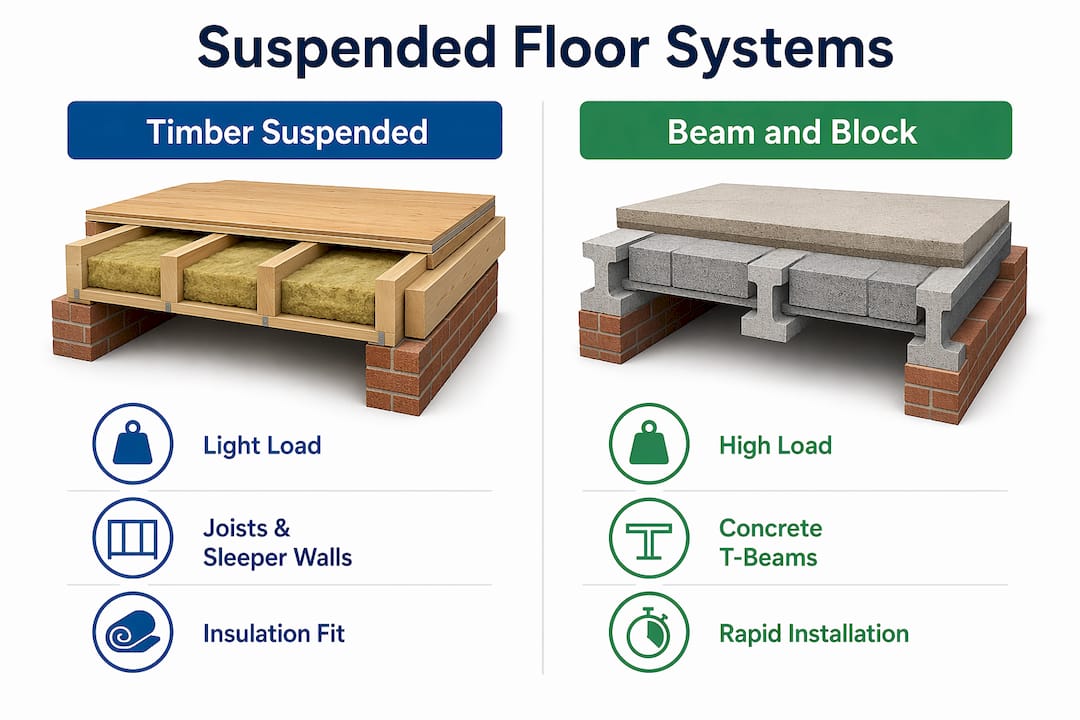
Suspended floor systems fall into two main categories: traditional timber and precast concrete beam and block. Understanding the difference is not just academic. It directly affects your load capacity, insulation strategy, and compliance with Part L of the Building Regulations.
Timber suspended floors
Timber suspended floors use joists spanning between sleeper walls, with insulation fitted between the joists. They suit lighter residential loads and older Cambridge properties where matching existing construction is a priority. The main drawback is moisture vulnerability. Cambridge’s clay-heavy ground can hold water, and without adequate sub-floor ventilation, timber joists rot. Achieving strong U-values with timber alone is also harder, typically requiring thicker insulation boards or specialist products.
Precast concrete beam and block
Precast concrete beam and block systems are the industry standard for most new Cambridge builds. Concrete T-beams span between supports, with infill blocks laid between them. The result is a rigid, load-bearing floor that handles both residential and commercial weights. Suspended floors in this category are commonly precast concrete rather than timber, with distinct load-bearing and insulation characteristics that make them better suited to modern energy targets.
| Feature | Timber suspended | Beam and block |
|---|---|---|
| Load capacity | Light to medium residential | Residential and commercial |
| Insulation performance | Moderate, depends on joist depth | High, with engineered insulation boards |
| Moisture risk | Higher, needs sub-floor ventilation | Lower, more durable in damp conditions |
| Part L compliance | Achievable but requires careful detailing | Easier to achieve with engineered systems |
| Installation speed | Moderate | Faster with precast components |
Engineered insulated systems are recommended over generic suspended floors for projects with strict energy efficiency goals under Part L. This matters in Cambridge, where new builds face tighter U-value targets every planning cycle.
Pro Tip: Request U-value calculations from your engineer or contractor before finalising your floor system. Changing the specification after groundworks begin costs significantly more than getting it right at design stage.
What site preparation does suspended floor installation require?
Site preparation is the most critical phase of any floor installation project. Subbase quality is the single most important factor for long-term suspended floor performance, and in-house regulation prevents costly failures. Skipping or rushing this stage is the leading cause of uneven floors and structural movement years after completion.
Cambridge presents specific ground challenges. Much of the city sits on chalk, gravel, and clay, and ground conditions vary sharply between sites. A site in Trumpington may behave very differently from one in Arbury. Your contractor must carry out a ground investigation before any beams are ordered.
The preparation sequence follows these steps:
- Ground investigation and survey. Confirm soil type, bearing capacity, and moisture levels. This data drives beam span calculations and insulation specification.
- Strip and excavate. Remove topsoil and organic material to the required formation level. Organic material left in place will compress over time, causing floor movement.
- Subbase installation and compaction. Lay and compact a granular subbase, typically Type 1 MOT stone, to the specified depth. Compaction must be verified with a plate compaction test.
- Damp-proof membrane (DPM). Lay a continuous DPM across the formation to prevent ground moisture rising into the floor structure.
- Perimeter beam supports. Install padstones or foundation walls to the correct level and alignment. Any deviation here transfers directly to the finished floor level.
Coordinating groundworks and flooring installation under a single contractor reduces the risk of conflicts and improves quality control. When groundworks and floor installation are managed by separate teams, responsibility disputes over level tolerances and moisture readings are common.
Pro Tip: Always check that your DPM laps up the inner face of the perimeter walls by at least 150mm and ties in with the wall DPC. This detail is frequently missed and creates a moisture pathway that is expensive to fix post-build.
How does the suspended floor installation process work step by step?
A well-managed installation follows a clear sequence. Deviating from this order creates problems that compound at every subsequent stage.
- Design sign-off. Confirm beam spans, block type, insulation specification, and target U-value with your structural engineer. All details must comply with Building Regulations Approved Document A (structure) and Part L (energy efficiency).
- Beam delivery and layout. Precast T-beams are delivered to site and positioned by crane or telehandler. Beams are laid at centres specified in the structural design, typically 600mm.
- Block infill. Infill blocks are placed between beams by hand. Each block sits on the bottom flange of the T-beam. No mortar is used at this stage.
- Insulation layer. Rigid insulation boards are laid over the beam and block deck before screeding. Insulated concrete suspended floors can achieve U-values as low as 0.07 W/m²K, reducing heating costs by up to 40% compared to traditional methods. That figure shows why insulation specification deserves as much attention as the structural design.
- Screed or structural topping. A sand and cement screed or a structural concrete topping is poured over the insulation. For large commercial sites in Cambridge, laser screed technology delivers flat, level floors with consistent quality across the full area.
- Power-floating. On commercial projects, the concrete surface is power-floated to achieve a dense, smooth finish. This step is not required for residential screeds that will receive a floor covering.
- Tolerance checks. The finished floor is checked against the specified level tolerances. Residential floors typically require a maximum deviation of ±3mm under a 3-metre straightedge. Commercial floors often demand tighter tolerances.
| Installation stage | Key compliance check | Relevant regulation |
|---|---|---|
| Beam and block layout | Span and centres match structural design | Approved Document A |
| Insulation layer | U-value meets or beats target | Part L |
| Screed or topping | Thickness and mix as specified | BS 8204 |
| Finished level | Within tolerance for floor covering | BS 8000-9 |
Rapid-installation thermal systems can cut construction programmes by up to 50% compared to traditional site-cast methods. For developers working to tight handover dates in Cambridge, this is a material advantage worth factoring into your programme from the outset.
What are the most common mistakes in suspended floor installation?
Most failures in suspended floor projects trace back to a small number of avoidable errors. Knowing them in advance is the most practical form of quality control.
- Inadequate subbase compaction. A subbase that has not been properly compacted will settle unevenly. This causes the perimeter supports to move, which cracks the screed and creates uneven finished levels.
- Ignoring thermal performance early. Developers frequently treat insulation as an afterthought. Specifying insulation after the structural design is fixed often means the floor build-up is too thick for the intended finished floor level, requiring costly redesign.
- Disjointed contractor responsibilities. When one contractor handles groundworks and another handles flooring, gaps in accountability appear. Integrated service providers handling both groundworks and flooring installation help avoid delays and responsibility disputes common in multi-contractor projects.
- Poor DPM detailing. A DPM with unsealed joints or insufficient wall laps allows ground moisture to migrate into the floor structure. In timber systems, this leads to rot. In concrete systems, it causes efflorescence and screed failure.
- Skipping tolerance checks. Floors that are out of level by more than the specified tolerance cause problems for every subsequent trade. Tiling, joinery, and fitted furniture all depend on a flat, level substrate.
“Investing in proper subbase preparation during initial construction stages avoids expensive structural failures and project delays. The cost of getting it right first time is always lower than the cost of remediation.”
Verify quality at three points: after subbase compaction, after beam and block installation, and after screeding. Each check takes less than an hour and protects against failures that take weeks to fix.
How should you maintain and inspect suspended floors after installation?
A suspended floor that is installed correctly still requires periodic inspection to retain its structural and thermal performance. The void beneath a suspended floor is not a sealed environment. Moisture, pests, and ground movement can all affect the structure over time.
- Annual visual inspection. Check accessible voids for signs of standing water, condensation, or debris blocking ventilation paths. Blocked airbricks are the most common cause of sub-floor moisture build-up in timber systems.
- Five-year professional check. Commission a structural inspection every five years, or after any significant ground movement near the building. Cambridge’s chalk and clay soils are susceptible to seasonal shrinkage and swelling.
- Watch for cracking in screeds. Hairline cracks in a screed are normal during curing. Cracks that widen over time, or that follow beam lines, indicate movement in the supporting structure.
- Monitor for damp in timber systems. Timber joists should be checked for signs of rot or insect damage. A moisture meter reading above 20% in timber indicates a problem that needs immediate attention.
Pro Tip: Keep a record of your floor specification, including beam layout, insulation type, and U-value calculation. This documentation supports warranty claims and is required for any future SAP assessment or EPC update.
For Cambridge foundations and groundworks that underpin suspended floors, the same principle applies. Regular checks protect the investment made at installation.
Key takeaways
Suspended floor installation in Cambridge demands the right system selection, thorough subbase preparation, and strict compliance with Part L to deliver durable, energy-efficient results.
| Point | Details |
|---|---|
| System selection matters | Choose beam and block for most new Cambridge builds; timber suits lighter residential loads only. |
| Subbase is the foundation of quality | Poor compaction is the leading cause of floor failure; verify with a plate compaction test. |
| Insulation drives compliance | Specify U-values at design stage to meet Part L without costly late-stage redesign. |
| Single-contractor coordination reduces risk | Integrated groundworks and flooring management prevents responsibility disputes and programme delays. |
| Regular inspection protects longevity | Annual visual checks and five-year professional inspections maintain structural and thermal performance. |
Why system selection is the decision most developers get wrong
I have seen developers spend considerable time debating floor finishes and almost no time on the floor system beneath them. That is the wrong order of priorities. The system you choose at design stage determines your U-value, your load capacity, your programme, and your compliance position. Changing it mid-project is expensive and disruptive.
The misconception I encounter most often is that all suspended floors are broadly similar and that the differences are minor. They are not. A timber system and a precast concrete beam and block system behave differently in Cambridge’s ground conditions, perform differently against Part L targets, and require different levels of subbase preparation. Treating them as interchangeable is a project risk.
My strongest advice to any developer or homeowner is to get U-value calculations done before the structural design is finalised. U-value assessments and site-specific guidance are necessary for achieving strong thermal performance, and specialists consistently flag this as the step most often skipped. The trade standards that govern decking and suspended structures reinforce the same principle: load-bearing and safety requirements must be resolved before aesthetic or finish decisions are made.
Ask your contractor three questions before signing anything: What U-value will this system achieve? Who is responsible for subbase preparation and level tolerances? And what happens if the finished floor is out of tolerance? The answers will tell you everything you need to know about whether they are the right team for the job.
— George
Gcscontractors: suspended floor and groundworks services in Cambridge

Gcscontractors delivers groundworks, site preparation, and civil engineering services across Cambridge and the surrounding area. For suspended floor projects, that means handling subbase regulation, drainage, and foundation work before the first beam is laid, so the floor installation starts on a verified, compliant base.
The team works within live environments and coordinates directly with flooring contractors to keep programmes on track. Whether you are planning a residential extension or a commercial development, Gcscontractors brings the site preparation expertise and local knowledge that Cambridge projects demand. For groundworks support that integrates with your floor installation programme, contact Gcscontractors directly through the services page.
FAQ
What is a suspended floor in construction?
A suspended floor is a floor structure supported on beams or walls, with a void beneath it rather than sitting directly on the ground. The two main types used in UK construction are timber joist systems and precast concrete beam and block systems.
Does suspended floor installation in Cambridge require Building Regulations approval?
Yes. All new suspended floors in Cambridge require compliance with Building Regulations, including Approved Document A for structural performance and Part L for thermal efficiency. A U-value calculation is required to demonstrate compliance.
What U-value should a suspended floor achieve under Part L?
Part L sets minimum thermal performance targets for new floors. Engineered insulated systems can achieve U-values as low as 0.07 W/m²K, well below the standard threshold, which reduces heating costs significantly.
How long does suspended floor installation take?
Installation time depends on the system and site size. Rapid-installation thermal systems can cut construction programmes by up to 50% compared to traditional site-cast methods, making precast beam and block the faster choice for most Cambridge projects.
Why is subbase preparation so important for suspended floors?
Subbase quality is the most critical factor for long-term floor performance. A poorly compacted subbase causes settlement, which leads to uneven floors, cracked screeds, and structural movement that is expensive to remediate.
Recommended
- Drainage installation Cambridge: the homeowner’s guide
- Construction Foundations in Cambridge: A Professional How-To Guide (2026) – GCS Contractors Ltd
- Concrete Slabs in Cambridge: A Professional Guide to Structural Installation – GCS Contractors Ltd
- Residential Drainage Systems: A Guide for Homeowners and Developers in Cambridge – GCS Contractors Ltd