Foundation building step by step: the homeowner’s guide
Foundation building step by step is the systematic process of constructing a stable, load-bearing base that supports a residential structure safely and meets UK building regulations. Every wall, floor, and roof above ground depends entirely on what sits beneath it. Mistakes during foundation construction cause expensive remediation later, yet most homeowners underestimate how much planning the process demands. This guide covers every phase, from soil testing and excavation through to concrete curing and final inspections, so you can approach your project with confidence and clarity.
What preliminary planning and site evaluation are required?
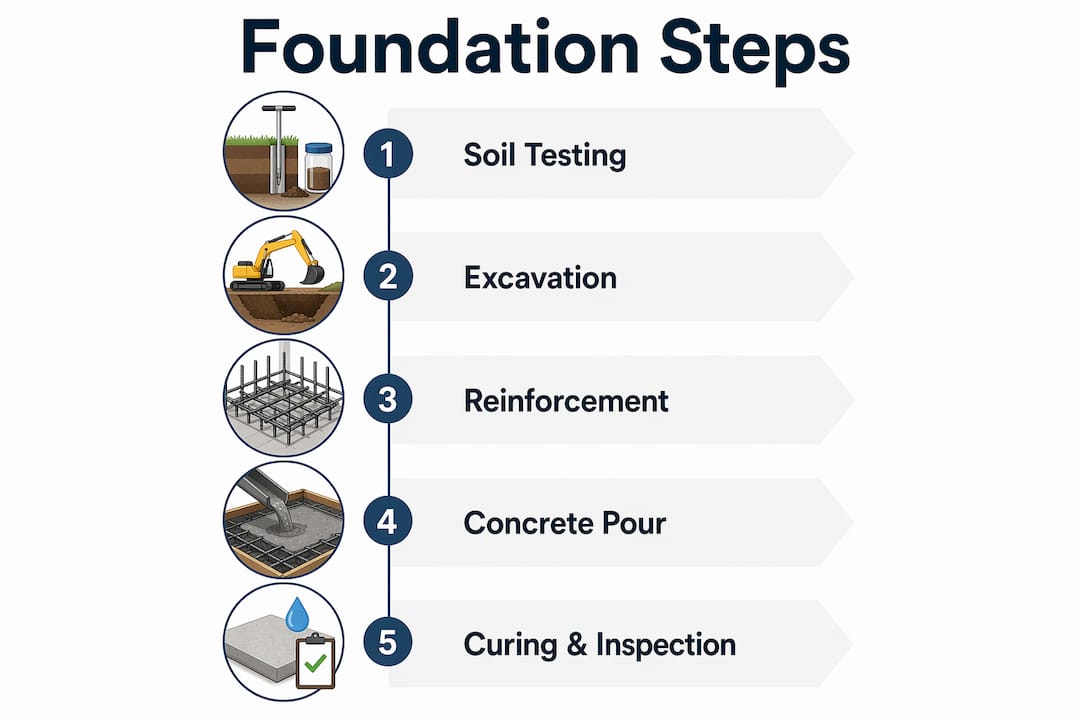
Good foundation work begins weeks before a single spade breaks ground. The first task is geotechnical soil testing. Visual inspection of soil is a common error that leads to foundation failure. Only formal borehole testing and laboratory classification reliably determine soil bearing capacity and settlement risk. Expansive clay soils, for instance, shrink and swell with moisture changes, which makes a formal geotechnical report non-negotiable on many UK sites.

Once soil data is in hand, a licensed structural engineer uses it to design the foundation. Many jurisdictions require stamped structural drawings for building permits, and the UK is no exception. Your local authority will want to see drawings that account for frost depth, load requirements, and drainage before granting approval. Skipping this step does not save time. It creates legal and structural risk.
Site surveying comes next. A surveyor marks the exact foundation footprint on the ground using pegs and string lines. This defines the dig area and prevents costly errors later. The site then needs clearing: removing vegetation, topsoil, and any existing structures or debris. Grading the cleared area promotes drainage and gives machinery safe access.
- Commission a geotechnical soil test before any design work begins
- Engage a licensed structural engineer to produce stamped drawings
- Hire a surveyor to mark the foundation footprint accurately
- Clear and grade the site to manage drainage and machinery access
- Check local frost depth requirements and confirm compliance with UK Building Regulations Part A
Pro Tip: Hiring a qualified groundworks contractor at the planning stage, rather than after problems arise, typically saves both time and money. Gcscontractors provides professional site preparation that covers soil assessment, clearance, and grading as a coordinated package.
How do you excavate and prepare footing trenches correctly?
Excavation is where planning becomes physical reality, and precision matters enormously. The trench depth must reach below the local frost line and into soil with adequate bearing capacity. Accurate footing trench depth is essential for foundation stability. Over-excavation is not simply wasteful. Soft or disturbed soil at the base of a trench must be remediated with compacted hardcore or lean-mix concrete before any structural work proceeds.
The foundation construction process for a typical UK residential project follows this sequence:
- Mark trench lines using string lines and spray paint based on the surveyor’s layout.
- Excavate to specified depth using a tracked mini-excavator for most domestic projects; hand-dig near existing services.
- Check for soft spots by probing the trench base. Any soft or waterlogged areas require removal and replacement with compacted granular fill.
- Compact the subgrade using a vibrating plate compactor to achieve a firm, even base.
- Install a blinding layer of lean-mix concrete (typically 50mm thick) to create a clean, level surface for reinforcement.
- Request a pre-pour inspection from your building control officer before placing any steel or concrete.
Common excavation mistakes include digging too wide without shoring, leaving loose soil at the trench base, and failing to protect open trenches from rain. Rain-softened trench bases are a leading cause of early settlement. Cover open trenches overnight with plywood or heavy-duty sheeting.
Pro Tip: Always verify trench dimensions against the structural drawings before calling for an inspection. Building control officers will measure depth and width on site. Discrepancies at this stage cause delays that set back the entire programme.
Best practices for installing reinforcement and formwork
Steel reinforcement, known as rebar, gives concrete the tensile strength it lacks on its own. Load path continuity from beams and columns through footings into the soil is a critical design requirement that amateurs frequently overlook. The structural engineer’s drawings specify rebar diameter, spacing, and lap lengths. Follow them exactly. Substituting a smaller bar diameter or wider spacing to save cost undermines the entire load path.
Key reinforcement and formwork requirements include:
- Rebar sizing and spacing: Use the diameter and centres specified on structural drawings. Typical strip footings in UK residential work use T12 or T16 bars at 200mm centres.
- Concrete cover: Maintain a minimum 75mm cover between rebar and the soil face, and 50mm cover to the top surface. Plastic chairs and spacers hold bars at the correct height.
- Formwork construction: Build formwork from 18mm structural plywood or proprietary steel panels. Brace it firmly so it does not bow under wet concrete pressure.
- Level and square checks: Use a spirit level and diagonal measurements to confirm formwork is level and square before any pour.
- Pre-pour inspection: Invite your building control officer to inspect reinforcement placement before concrete is ordered. This is a statutory requirement in most UK projects.
The custom home build process reinforces that reinforcement and formwork are the stage where structural decisions made on paper become physical reality. Errors here are expensive to correct once concrete is placed.
How to mix, pour, finish, and cure a concrete foundation
Concrete quality determines how long your foundation lasts. Selecting the correct mix is the first decision. For most UK residential strip foundations, a C25/30 designated mix is standard. Order from a ready-mix supplier and confirm the slump class matches your pour conditions. A mix that is too wet gains less strength. A mix that is too stiff is difficult to consolidate around rebar.
The pouring sequence runs as follows:
- Inspect formwork and rebar one final time immediately before the lorry arrives.
- Pour continuously from one end of the trench to the other. Continuous placement avoids cold joints, which are weak planes that form when fresh concrete is placed against partially set concrete.
- Vibrate the concrete using a poker vibrator at 450mm intervals. This removes trapped air pockets and consolidates the mix around rebar.
- Finish the surface with a float to achieve a level, even top. Install anchor bolts or starter bars at specified positions while the concrete is still workable.
- Begin curing immediately after finishing. Cover the surface with polythene sheeting or a proprietary curing membrane.
- Maintain curing for a minimum of seven days in normal UK temperatures. Do not allow the surface to dry out or freeze.
Inadequate curing leads to cracks and reduced strength. Premature drying is the single most common cause of surface cracking on residential foundations. In cold weather, insulating blankets protect the pour from frost damage. In hot, dry conditions, wet hessian under polythene retains moisture effectively. Building control will typically require a curing period to elapse before framing work begins.
How to complete backfilling, drainage, waterproofing, and final inspections
The foundation is not finished when the concrete sets. Moisture management and backfilling are equally critical to long-term performance. Foundations must include moisture management systems such as site grading, drainage, and waterproof membranes. These are mandatory components of foundation construction, not optional extras.
Waterproof membranes and drainage systems protect against water ingress and structural damage. Apply a bituminous or tanking membrane to the external face of the foundation wall before backfilling. Install a perimeter drain, typically a 100mm perforated pipe in a gravel-filled trench, to carry groundwater away from the structure.
Backfilling and drainage checklist:
- Apply waterproof membrane to all below-ground external faces
- Lay perimeter drainage pipe at the base of the foundation wall
- Backfill in 150mm–300mm compacted layers using granular material
- Grade the finished surface to fall away from the building at a minimum 1:20 slope
- Document all stages with photographs for building control records
Signs of foundation issues to monitor after completion:
| Warning sign | Likely cause |
|---|---|
| Diagonal cracks at window corners | Differential settlement |
| Horizontal cracks in foundation wall | Lateral soil pressure |
| Damp patches on internal walls | Failed waterproof membrane |
| Doors or windows sticking | Foundation movement |
The final inspection by your building control officer confirms that the foundation complies with the approved drawings and UK Building Regulations Part A. Obtain a written sign-off before any superstructure work begins. This document protects you legally and is required when selling the property.
Key takeaways
A sound residential foundation requires geotechnical testing, accurate excavation, correct reinforcement, continuous concrete placement, and thorough moisture management before any superstructure work begins.
| Point | Details |
|---|---|
| Soil testing is non-negotiable | Formal geotechnical testing determines bearing capacity; visual inspection is unreliable. |
| Trench depth must meet frost line | Excavate to the depth specified by your structural engineer and confirmed by building control. |
| Reinforcement follows drawings exactly | Rebar size, spacing, and cover must match stamped structural drawings to maintain load path integrity. |
| Curing takes at least seven days | Cover concrete immediately and maintain moisture for a minimum of seven days to prevent cracking. |
| Waterproofing is mandatory | Apply membranes and install perimeter drainage before backfilling to prevent long-term moisture damage. |
Why I never skip the planning stage
Having worked on residential groundworks projects across the UK for many years, the pattern I see most often is homeowners rushing the early stages. They want to see concrete in the ground. The planning feels slow and bureaucratic. I understand that instinct completely. But the planning stage is where the entire project is either protected or put at risk.
The most expensive call I receive is from a homeowner who has already poured a foundation without a geotechnical report. Expansive clay beneath a strip footing will move. It does not matter how good the concrete mix was. Foundation design involves conservative safety margins built in by professionals precisely because soil behaviour is variable and unpredictable. Those margins only work if the design is based on real soil data.
My honest advice: do not treat the structural engineer as an optional expense. Their stamped drawings are your legal protection, your quality assurance, and your building control approval all in one document. The role of structural engineering in a residential build is not administrative. It is the difference between a foundation that lasts a century and one that needs underpinning within a decade.
Patience during curing is the other lesson I keep repeating. Seven days feels like a long wait when you are eager to start framing. But concrete that has not fully cured will crack under load. That crack does not announce itself immediately. It shows up two winters later as a damp patch or a sticking door. Build the time into your programme from the start.
— George
Gcscontractors: professional groundworks and foundation services
Residential foundation work demands technical knowledge, the right plant, and a clear understanding of UK Building Regulations. Gcscontractors delivers all three.

Gcscontractors specialises in groundworks and civil engineering for residential and commercial projects, covering site setup, excavation, drainage, and foundation construction. The team works within live environments with minimal disruption and maintains full compliance with health, safety, and local building regulations throughout every project. Whether you need a site cleared and graded or a complete foundation constructed to structural drawings, Gcscontractors brings the experience to get it right first time. Contact the team through the groundworks and foundation services page to discuss your project requirements.
FAQ
What is the first step in building a residential foundation?
The first step is geotechnical soil testing to determine bearing capacity. Without this data, no reliable foundation design can be produced.
How deep should a foundation trench be in the UK?
Depth depends on soil type, load, and local frost conditions, but most UK strip foundations sit at a minimum of 1 metre below finished ground level. Your structural engineer specifies the exact depth.
How long does concrete need to cure before framing begins?
Concrete requires a minimum of seven days of controlled curing before framing loads are applied. Cold or wet weather extends this period.
Do I need building control approval for a foundation?
Yes. UK Building Regulations Part A requires building control approval and inspection at key stages, including before and after the concrete pour.
What causes foundation cracks after construction?
The most common causes are inadequate curing, differential soil settlement, and failed waterproofing. Improper curing and poor moisture management account for the majority of early-stage foundation defects.