Drainage installation steps: a homeowner’s guide
Drainage installation steps are the systematic procedures used to build a residential drainage system that manages water flow away from your home and garden. The most widely used method for residential properties is the French drain, a subsurface system built from perforated pipe, geotextile fabric, and gravel aggregate. Done correctly, it protects foundations, prevents waterlogging, and stops surface flooding before it causes structural damage. This guide covers every stage of the process, from gathering materials to testing the finished system, with practical tips drawn from real groundworks experience.
What tools and materials do you need for drainage installation?
The right materials determine whether your drainage system lasts five years or fifty. Gather everything before you break ground, because stopping mid-dig to source supplies is where most DIY projects go wrong.
Essential tools
- Spade and long-handled shovel
- Spirit level and line level
- Timber stakes and string line
- Hand tamper or plate compactor
- Tape measure
- Wheelbarrow
- Safety gloves, steel-capped boots, and eye protection
Material specifications
| Material | Specification | Purpose |
|---|---|---|
| Perforated pipe | 100 mm diameter, slotted | Collects and channels groundwater |
| Crushed stone | 3/4-inch washed aggregate | Maintains voids for water intake |
| Geotextile fabric | Non-woven, water-permeable | Filters soil and prevents silting |
| Solid outlet pipe | 100 mm diameter, unperforated | Carries water to discharge point |
| End cap or grate | Matching pipe diameter | Seals or opens system entry points |
The non-woven geotextile fabric is the component most homeowners underestimate. It allows water to pass freely while keeping soil particles out. Without it, fine silt migrates into the gravel and blocks the system within a few seasons.
Pro Tip: Source your crushed stone and geotextile fabric from a builders’ merchant rather than a garden centre. Builders’ merchants stock material to civil engineering specifications, which means consistent grading and correct permeability ratings.
How to plan and prepare your drainage system layout and trench
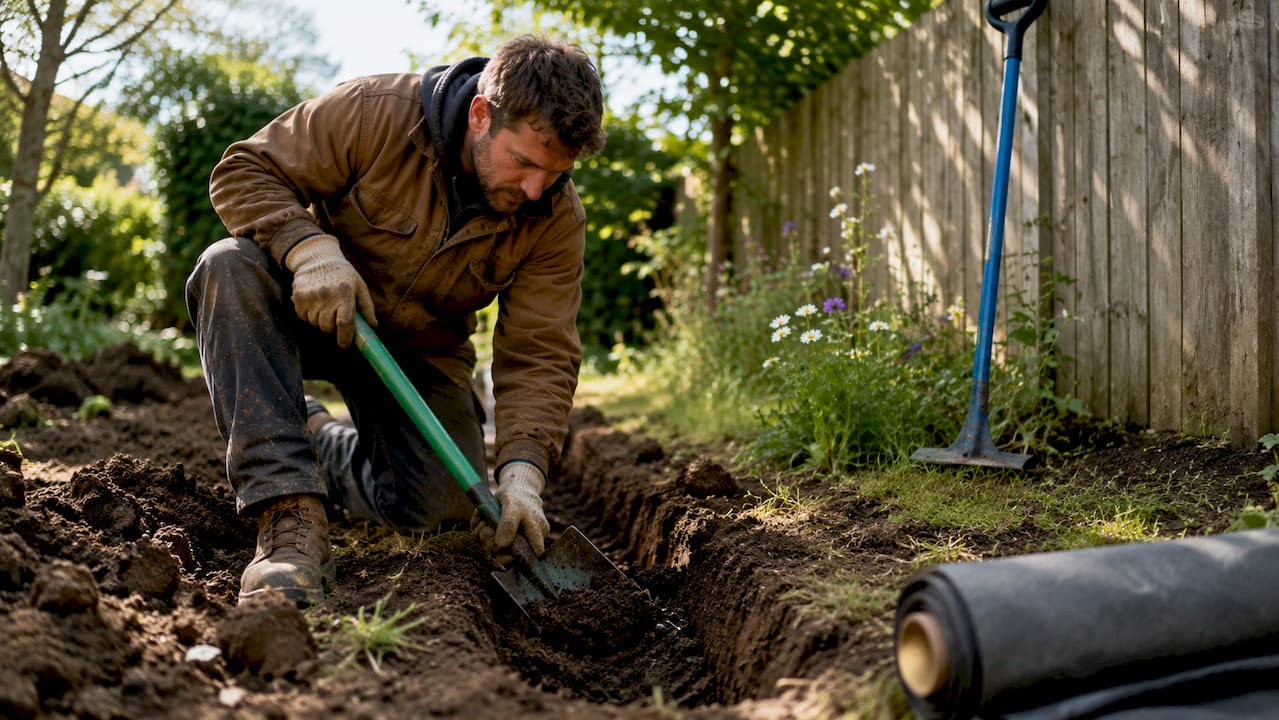
Planning is the stage where most residential drainage projects either succeed or fail. A poorly routed trench or an incorrect gradient means water sits in the pipe rather than flowing to the outlet.
Step-by-step planning process
- Map the water problem. Walk your garden after heavy rain and identify where water pools. The drain inlet must sit at or near the lowest point of the problem area.
- Identify the discharge point. Water must exit somewhere legal and safe. Options include a soakaway pit, a watercourse, or a surface water drain. Check UK building regulations before connecting to any public sewer.
- Mark the trench route. Use timber stakes and string line to mark the path from inlet to outlet. Follow the natural slope of the land wherever possible.
- Calculate your gradient. The minimum slope is 1%, which equals a 10 mm drop for every metre of pipe. Use a spirit level and tape measure to verify this along the full length before you dig.
- Call before you dig. Contact a utility locating service to identify buried gas, electric, water, and telecoms lines. Striking a buried line is the most serious hazard in any excavation project, and it is entirely preventable.
Correct gradient is the single most important technical factor in a French drain. A pipe laid flat will hold standing water and become a breeding ground for blockages. A pipe laid too steep may erode the gravel bed. Aim for 1% and verify it at every metre.
Pro Tip: Tie a small spirit level to your string line as you set it between stakes. This gives you a continuous visual reference for slope without needing to re-measure constantly.
Trench dimensions
Standard trench dimensions for a French drain are 300–450 mm wide and 450–600 mm deep. These measurements accommodate the pipe, the gravel surround, and the fabric wrap with enough room to work comfortably. Narrower trenches make fabric placement difficult and reduce the gravel volume available to absorb water.
What are the step-by-step procedures for installing the drainage system?
With your trench marked and utilities located, you can move into the installation workflow. Follow these steps in sequence. Skipping or reordering them creates problems that are expensive to fix once the trench is backfilled.
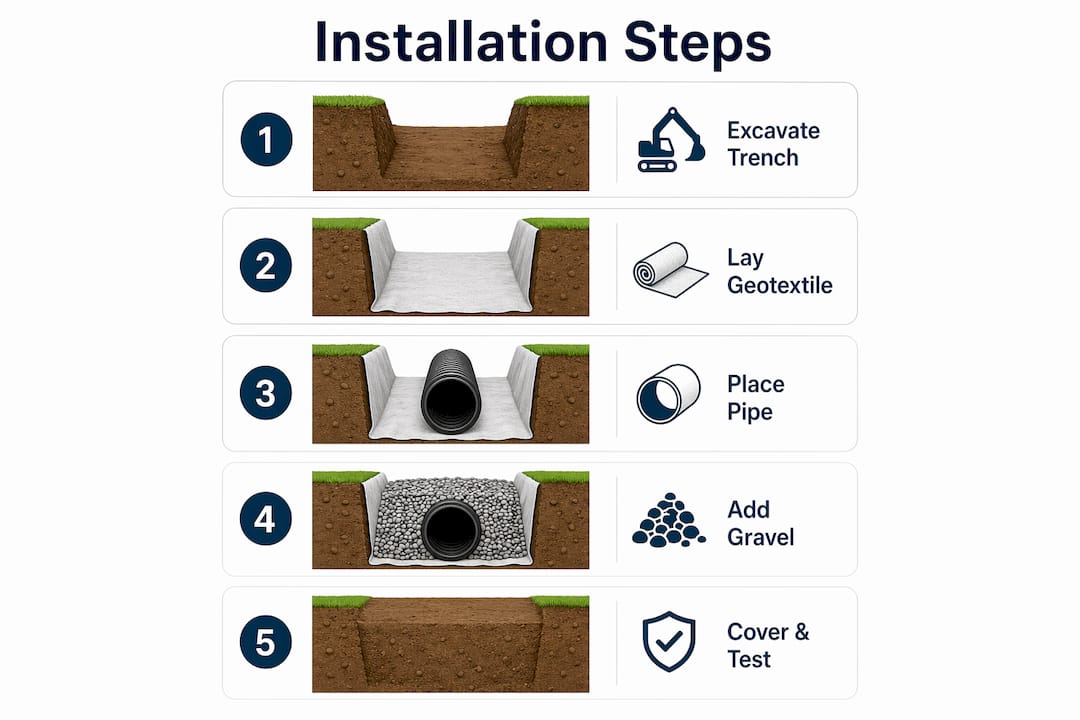
- Excavate the trench. Dig to your marked dimensions, keeping the base as level and consistent as possible. Remove all loose soil and stones from the trench floor.
- Line the trench with geotextile fabric. Lay the non-woven fabric along the full length of the trench, pressing it into the corners and up both sides. Leave at least 300 mm of excess fabric draped over each edge. You will fold this over at the end.
- Add the gravel base layer. Pour 75–100 mm of 3/4-inch washed crushed stone onto the fabric base. Spread it evenly and tamp it lightly to create a firm, level bed for the pipe.
- Lay the perforated pipe. Place the pipe on the gravel bed with the holes facing downwards. This orientation allows groundwater to rise from below into the pipe, while reducing the risk of debris falling in from above and causing blockages. Maintain your 1% gradient throughout.
- Cover the pipe with gravel. Pour more crushed stone over and around the pipe until it is fully encased. The gravel layer above the pipe should be at least 75 mm deep.
- Fold the fabric over the gravel. Bring the excess fabric from both sides up and over the top of the gravel, overlapping in the centre. This is the burrito wrap technique, and it seals the gravel against soil intrusion from above. Without this step, soil migrates down into the aggregate over time and reduces drainage capacity.
- Backfill with soil. Cover the wrapped gravel with the excavated topsoil. Compact it gently in layers to avoid air pockets. Leave the surface slightly raised to allow for settlement.
- Install the discharge point. Connect the outlet end of the pipe to your agreed discharge location. Fit a grate or end cap to prevent animals and debris from entering the system.
Pro Tip: Always lay the perforated pipe with holes facing down. Many first-time installers assume holes should face up to catch surface water, but the system is designed to collect groundwater rising from below. Holes facing up fill with grit and block within months.
Installation summary table
| Step | Key material | Critical check |
|---|---|---|
| Excavate trench | Spade, tamper | Dimensions and gradient correct |
| Line with fabric | Non-woven geotextile | Excess draped over both edges |
| Add gravel base | 3/4-inch crushed stone | 75–100 mm depth, level |
| Lay perforated pipe | 100 mm slotted pipe | Holes facing down, slope maintained |
| Cover with gravel | 3/4-inch crushed stone | Pipe fully encased |
| Fold fabric over | Geotextile overlap | Full coverage, no gaps |
| Backfill | Excavated topsoil | Compacted in layers |
| Install discharge | Solid pipe, grate | Legal outlet confirmed |
How to test and maintain your drainage system after installation?
Testing confirms the system works before you restore the surface. Maintenance keeps it working for years without costly repairs.
Testing the system
Pour water into the inlet and watch the discharge point. Water should appear at the outlet within a few minutes. If no flow occurs, the gradient may be insufficient or a section of pipe may have shifted during backfilling. Re-open the relevant section and re-check the slope before restoring the surface.
Signs of drainage failure to watch for
- Standing water returning to the same area after rain
- Slow or no discharge at the outlet after heavy rainfall
- Visible soil settlement or sinkholes along the trench line
- Foul odour near the outlet, which may indicate a connection issue
Basic maintenance checklist
- Clear leaf litter and debris from inlet grates every autumn and spring
- Flush the pipe with a garden hose annually to dislodge any sediment
- Check the discharge point after storms to confirm it is not blocked
- Inspect the fabric at any exposed sections for tears or soil breakthrough
- Monitor the backfilled area for settlement and top up with soil as needed
When to call a professional: if the system fails within the first two years, or if you notice consistent pooling despite a functioning outlet, the gradient or pipe orientation may be incorrect. A drainage engineer can carry out a CCTV survey to identify the fault without full excavation.
Pro Tip: Mark the trench route on a simple sketch plan and keep it with your property documents. Future owners, builders, or utility workers will need to know where the drain runs, and a buried pipe is impossible to locate without records.
Key takeaways
Correct drainage installation depends on achieving the right gradient, using geotextile fabric throughout, and orienting perforated pipe with holes facing downwards to capture groundwater effectively.
| Point | Details |
|---|---|
| Gradient is non-negotiable | Maintain a minimum 1% slope to guarantee gravity flow along the full pipe length. |
| Fabric prevents failure | Non-woven geotextile fabric stops soil migrating into gravel and blocking the system. |
| Pipe orientation matters | Perforated pipe holes must face downwards to collect rising groundwater and resist silting. |
| Utility checks save lives | Always contact a utility locating service before any excavation, without exception. |
| Test before backfilling | Pour water into the inlet and confirm discharge before restoring the surface permanently. |
What I have learned from years of drainage projects
After working on groundworks across residential and commercial sites, the pattern I see most often is this: homeowners get the big decisions right and overlook the small ones. They buy the correct pipe and the right gravel, then lay the pipe with holes facing up because it seems logical. The system blocks within a year and they cannot understand why.
The burrito wrap technique is another step that gets skipped because it looks optional. It is not. Soil is relentless. Given any gap in the fabric, fine particles will work their way into the aggregate over several seasons and reduce the system to a useless gravel-filled trench.
My strongest advice is to spend more time on planning than on digging. Verify your gradient at every metre before you place a single stone. A 10-minute check at the planning stage saves a full re-excavation later. And always, without exception, call the utility locating service before you dig. I have seen projects delayed by weeks because a buried telecoms cable was struck that nobody knew existed.
DIY drainage is genuinely achievable for a motivated homeowner. The steps are not complicated. What separates a system that lasts twenty years from one that fails in two is attention to the details that most guides treat as footnotes.
— George
How Gcscontractors can support your drainage project

Residential drainage is straightforward when conditions are ideal. Compacted clay soil, high water tables, or proximity to existing infrastructure can make even a standard French drain installation significantly more complex. Gcscontractors specialises in groundworks and drainage for residential and commercial sites across Cambridgeshire, with experience in live environments where disruption must be kept to a minimum. Whether you need a full drainage design, trench excavation, or a professional assessment of a failing system, the team brings civil engineering expertise to projects of every scale. For site preparation that goes beyond drainage, the site preparation guide covers the full scope of groundworks services available. Contact Gcscontractors to discuss your project and get tailored advice from experienced contractors.
FAQ
What is the minimum slope for a residential French drain?
The industry standard gradient is 1%, which equals a 10 mm drop per metre of pipe. This ensures consistent gravity flow from inlet to outlet.
Which way should perforated pipe holes face?
Pipe holes should always face downwards. This allows groundwater to rise into the pipe from below and prevents debris from falling in from above.
How deep should a residential drainage trench be?
Standard trench depth is 450–600 mm, with a width of 300–450 mm. These dimensions accommodate the pipe, gravel surround, and fabric wrap correctly.
Do I need planning permission to install a French drain?
You do not typically need planning permission for a subsurface French drain on private land, but you must comply with UK building regulations if connecting to a public sewer or watercourse. Always check with your local authority before work begins.
How do I know if my drainage system is working correctly?
Pour water into the inlet and observe the discharge point. Water should flow out within a few minutes. No flow indicates a gradient problem or a blockage that requires investigation before backfilling.
Recommended
- Residential Drainage Systems: A Guide for Homeowners and Developers in Cambridge – GCS Contractors Ltd
- Drainage Pumping Stations: A Guide to Professional Installation and Infrastructure – GCS Contractors Ltd
- Surface Water Drainage Solutions: A Comprehensive Guide for UK Developers (2026) – GCS Contractors Ltd
- Professional SuDS Drainage Installation in Essex: A 2026 Guide – GCS Contractors Ltd
Need drainage work in Cambridge? GCS Contractors Ltd installs soakaways, attenuation tanks and foul & surface water drainage to Building Regulations Part H. See our drainage services in Cambridge or call 07500 570 926 for a free quote.